Monday, March 7, 2011

Freebie: Layout & Template

When I was in fifth grade, my teacher told me something that would stick with me forever:

“Always KISS- Keep It Simple, Stupid!”

Now, while I don’t support teachers who make a habit of calling their students stupid, I can attest to the fact that simplicity, whether it be in life, in writing, or yes, even in scrapbooking, is an excellent way to make a bold statement.

Often, as scrappers, we find ourselves with a whole slew of pictures from our most recent exploit, but really only one good one. In my case, I’ll have 800 pictures from any given event, and I might keep three of them. (I’m a little shutter-happy.) So when I get home, and I’m sorting through hundreds of pictures, and I pick my one keeper, I then find myself saying something like, “Oh dang it! A one-photo layout?! Lame!”

And to that little voice, I then respond, “NAY! A great layout can be made with just one photo!”

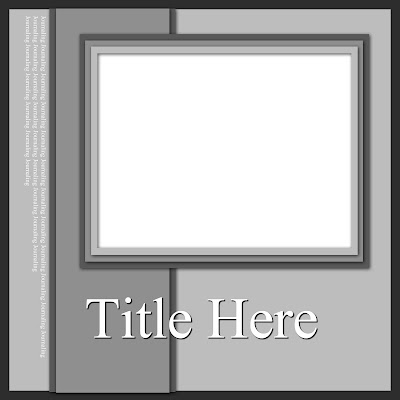
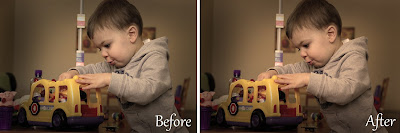
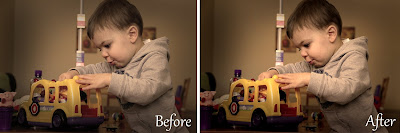
I did it, and you can too, with a little help. Sometimes the best layouts feature one beautiful photo that tells a beautiful story- and the layout just helps it shine more. For example, this layout:


Notice how the whole layout seems to frame the focal point, and serves to draw the eye right to the kiddo? By choosing to keep the page free of elements, putting in just a little bit of well-placed journaling, and triple framing the photo, the beholder automatically is drawn to the photo- the whole point of the layout.

Now it’s YOUR turn! Here’s a freebie for you- the template (shadows and shapes included) for you to add your own papers, photos, journaling, and title work and make a beautiful simple layout. Just go my website, and use the access code FREE01 to download.Feel free to share your layout with us! Put a link to your layout in the comments, and I’ll pick one to feature later this week.

(Just CLICK HERE, and use the access code FREE01 to download.)


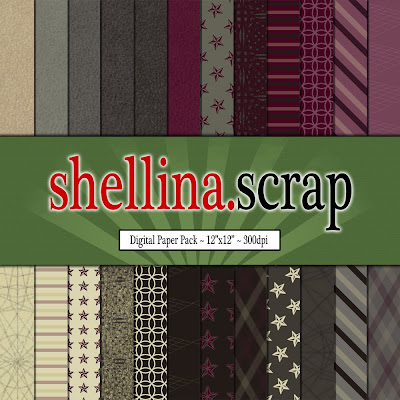
And hey- do you like the papers used in the layout shown above? They can be yours! The Iron and Wine paper pack from ShellinaScrap is available now at my shop.


Happy Scrapping!

Also: Don’t forget about the huge CONTEST going on until Friday March 11- you could win a whole bunch of free digital scrapbooking stuff!

Sunday, March 6, 2011

One Thousand Gifts

I've been following a blog lately: A Holy Experience, which is written by another stay at home momma who has dedicated her life to the Lord and finding joy in the little things. She wrote a book- One Thousand Gifts, all about her life and her passion. I'm totally loving the idea of this- finding precious, beautiful moments in the small things. So, slowly, I'll be making my own list of 1,000 joys. Here's the beginning:

  1. Aaron (my kiddo). There's never a time when his gentle touch and smile can't turn a foul mood around. He's precious, a true gift, and a blessing to say the least.
  2. Mike (The hubbster). I've not always appreciated him for what he is: my best friend, my protector, my peaceful spot in the crazy.
  3. Warm Earl Grey tea- possibly the best part of my morning. A little bit of french vanilla creamer, two sugar cubes, and I'm in heaven.
  4. Words of wisdom- in my 25 years, I've made some mistakes. But I've also side-stepped some horrible pitfalls due to the wisdom shared with me by friends, family, and strangers even. God knows where I'd be without them.
  5. The green quilt I made for the Aar-bear when we was born is possibly my most treasured possession to date. I can't put my finger on it, but I think it might be because it's become the centerpiece of our living room- just like Aaron has become the center of our lives.
  6. My bunny slippers- I live in Minnesota. Of course I love my slippers.
  7. Laptops- it's silly, but I'm thankful for 'em.
  8. Aaron kisses are sweet, gentle, and sometimes sloppy. But precious.
  9. Dinner together every evening is a good time for us. Sure, Aaron fights his booster seat, Mike's tired and zoned out from a long day of work, and my back hurts, but looking around that little kitchen table, seeing those smiling (or un-smiling) faces- there may be no better feeling.
  10. My journal- I don't write in it much, to be honest. But in the hard times, I do. And now, I've got pages upon pages filled with stories of struggles, but most importantly, victories. Someday, I'll share them with my children maybe. Maybe not.
So, I know, it's only 10, but I fully intend on finishing. Check out the book, and come back for more thankfulness- maybe start a list of your own.

holy experience

Saturday, March 5, 2011

Tutorial: Sepia Photo Treatment


Post-processing photos can be downright terrifying- the prospect of the job itself can freak out even the most talented of scrappers. But, fear not- it doesn’t have to be scary. Take the ever-popular sepia photo treatment for example. Surely it must be laborious and terrible, right?

Wrong.

Here’s a simple step-by-step plan to easily transform a color photo to a sepia masterpiece using Photoshop CS.


Step 1: From the “Image” drop-down menu, select “Adjustments”, and then “Levels”. This is the most difficult part of the whole process. When you look at the level map, (it’ll resemble a mountain range), you’ll notice two arrows at each bottom corner. Click and drag these arrows to the very beginning of the up-hill slope on each side. You might not have to do this- some photos already have proper levels. Don’t pull the arrows into the slope- just bring it right to the beginning of the incline.


Step 2: From the “Image” drop-down menu, select “Adjustments”, and then “Photo Filter”. Choose “Sepia” from the drop-down menu. Adjust the density to desired percentage- use as much or as little brown pigment as you like. For mine, I used a ton- 96%.


Step 3: Select the “Burn” tool from the tool panel. Make the brush nice and big, (I used 1014 pixels), change the range dropdown menu to “Highlights”, and lower the Exposure to 9%. Use the tool to darken the edges of the photo, focusing on anything particularly bright or attention-grabbing. The object of this is to further bring the focus to our subject.


Step 4: From the “Image” drop-down menu, select “Adjustments”, and then “Photo Filter”. Select “Warming Filter 85”, and adjust the density to 25% (or desired percentage).


Step 5: From the “Image” drop-down menu, select “Adjustments”, and then “Brightness/Contrast”. Adjust the contrast to the desired level, in this case 15.


And now you’re done! Your color photo is now a sepia photo- rich in hue, aged to perfection.


Have questions about other photo-processing techniques and would like to see more tutorials? Leave your suggestion in the comment area- we hope to see you again soon!


Also: Don’t forget about the huge CONTEST going on until Friday March 11- you could win a whole bunch of free digital scrapbooking stuff!

Friday, March 4, 2011

Hello Spring! How 'bout a CONTEST?!

Okay, so spring hasn't actually "sprung" here in Minnesota, but it will someday. And when it does, I am SO beyond ready. And when I say "ready", I mean I've already got my flip-flops lined up in the closet, my capris are washed and ready, and I bought new preggo t-shirts to celebrate the warming weather. I. AM. READY.

As if to show my great anticipation for all things "springy", my shop has begun to resemble some kind of floral garden of color, inspiration, and delight. Come, enjoy with me. Smell the goodness of spring.


Inspired by the bright, light-weight, seemingly perfect hues and fabrics of spring and summer, this pack is vibrant, exciting, and adorable.


Reminiscent of those first couple of bright, sun-shiney days of spring- you know the ones- you wake up and you just KNOW it's going to be a good day. That's this paper pack in a nutshell- pure solar happiness.


With warmer weather, inevitably, comes new fashion, and even if I don't understand it, plaid is one of those new spring fashion additions to seemingly everyone's wardrobe. Even though I've never been able to successfully pull of the look, I commend those who can- and I salute thee with this delicious paper pack.


What's more "springy" than Easter? Green grass, colored eggs, grown men dressed up in bunny costumes- the whole thing is celebratory and Hallmark has done its best to make it remarkable. Also, more importantly, the resurrection of Jesus Christ- the promise of new life. These light floral colors are the perfect all-purpose papers for the everyday scrapper in you.


Perfect combos of pospicle-flavors surrounded by flowers, swirls, and a general joyful appeal, this kit is sure to be the perfect accompaniment to any springy layout. Try it- I dare you. You'll smile.


Now that you've had a proper dose of sunshine, get to work! I'd love to see your favorite spring-themed scrapbook layouts- submit a link to yours in the comment area, and by Friday March 11 at noon, I'll pick a winner. Winner gets ALL of the sets featured in this post. For free. Get excited!

Thursday, March 3, 2011

What We're Eating: Chili & Corn Casserole


I've heard that some of my friends across the US are experiencing some beautiful spring changes in the weather. Some are even wearing short sleeved shirts and mowing their lawns. I hate you all. ;) Here in Minnesota, winter is still in full effect. Today it was just over twenty degrees (F), a bit breezy, and the snow is fore-casted to be moderately heavy starting this next week. It's downright chilly, folks, and that means Momma's Home Cookin' is also still in full swing- let's not kid ourselves- a hearty meal that stick to yer bones is downright necessary these days. With that in mind, what feels more hearty and warm than a big ole bowl of chili and some corn casserole? Not much. ;)

Guthrie Family Chili


Ingredients:
  • 1 lb ground beef
  • 1 large onion, chopped
  • 1 tsp salt
  • 1 large can (29 oz) tomatoes (process in blender)
  • 1 (8 oz) can tomato sauce
  • 1 large or 2 small bay leaves
  • 1/2 tsp to 1 tsp chili powder
  • Pinch cayenne pepper
  • 1/8 tsp paprika
  • 1 can (15.5 oz) chili beans
Directions:
  1. Brown ground beef and onion in a heavy skillet.
  2. Add remaining ingredients.
  3. Simmer gently til ready.
  4. If it thickens up too much, add water a bit at a time to desired thickness.
My Changes:

We like it hearty, so we do 2 pounds of ground beef. Delish.
  • I use A LOT more chili powder. Like, 3 tablespoons. So good. Here's our fave- Williams Sonoma Ancho Chili Powder, $6. (at left)
Also, more cayenne pepper. We like a reason to add sour cream and cheese once it's done... Um, yum.


Corn Casserole

I know, a lot of my west coast readers are gonna say, "Corn Casserole? What is THAT?" But hey, trust this mid-westerner when she says it's AWESOME. Minnesotans, while being strongly misguided on their choice of climate, have got the whole casserole thing down pat. Try it, and prove me wrong. (Impossible.)


Ingredients:
  • 2 cans whole kernel corn, drained
  • 1 can cream corn
  • 1 stick margarine melted
  • 2 eggs slightly beaten
  • 8 oz sour cream
  • 1 box Jiffy muffin mix
Instructions:
  1. Combine all ingredients.
  2. Bake at 350 degrees until set- approximately 1 hour.
  3. DEVOUR.
The whole supper can be made in an hour, and is easy easy easy. Perfect after a snowball fight, or after a day of staring out the window hating all things winter. Enjoy. :)

Pregnancy Stuff: Lower Abdominal Pain

Okay, before we all freak out here, I am quite aware that abdominal pain during pregnancy can be a sign of bad things to come. I've been there folks. This is different- so no worries. ;)

Over the last week or so, I've noticed some pain- kind of a pulling, sharp pain- in my lower abdominal area. (Read: groin.) It's present when I'm rolling over in bed, getting up from bed, or walking quickly (when I hit 3.0 speed on the treadmill, it's noticeable, 3.5- almost too much to bear). Putting on my pants in the morning is kind of horrible too- the lifting of one leg without the other is a motion I literally grit my teeth against.

I remember, when I was pregnant with Aaron, that rolling over in bed was uncomfortable, but I don't remember pain like this. Being the little research-when-you're-worried person I am, I spent a little time with my friend Google to figure out what's going on.

My Findings:
  1. I'm not the only woman who has experienced this and yet still given birth to a healthy, vibrant child. (Cheers!)
  2. There are apparently several completely normal reasons for the pain.
  3. The first is, like so many other pregnancy ailments, directly attributed to hormones. They actually work to loosen the muscles of the abdomen and pelvic area to prepare the body for birth- totally normal. But sometimes, the lack of support due to loosening is uncomfortable.
  4. The second is, duh, I've got something foreign growing in me and my muscles are sending me a message: "Despite the fact that we stretch regularly for your binge eating exploits, we never expected this intrusion and quite frankly, we're making you pay."
  5. Third: Round ligament pain. Okay, so there's a ligament that attaches to the uterus that is there to support it, and the only way it's going to support the 9 pound child I'm going to soon be lugging around within me (I make em big) is if it gets stronger along the way, which includes some pain.
  6. Fourth (and scariest): Symphysis Pubis Dysfunction. This is where, as above, the hormones loosen the muscles, but they work too hard at it, and the muscles holding my four pelvic bones together start literally going slack. The result is an over-separated pelvis, which can be a huge issue. (Read a horror story about a woman who needed surgery to reconnect them... ugh.)
So, obviously, there's something going on here, but luckily, it's NORMAL. (Three more cheers!) And, luckily for me, (note sarcastic tone), there are exercises that can provide some relief. While I fundamentally hate exercise in most forms, I think these ones are worth doing:
  1. Crunches- they suck, but apparently they also suck in your tummy, which helps.
  2. Pelvic tilts- easier than crunches, still lying on the floor.
  3. Roll backs- reverse crunches. Start sitting up, roll almost all the way down (just to that uncomfortable spot where you can feel your tummy muscles working), hold, and sit back up.
Luckily for us preggos, exercise is directed only three times a week, and pain is always a sign that you should stop or take a break.

I'll keep you updated on what works, and if I've found any relief. You know, after I sit here on the couch for a while longer. (It feels good, darn it!)

Resources for this post:

Wednesday, March 2, 2011

What We're Eating: Applebee's Oriental Chicken Salad


It's always fun to get new recipes, so here's a yummy one for my fans: Applebee's Oriental Chicken Salad, a fresh, yummy, healthier-than-KFC meal that is light but holds it own.


Ingredients

Salad:
  • 1 Egg
  • 1/2 cup Milk
  • 1/2 cup Flour
  • 1/2 cup Corn Flake Crumbs
  • 1 teaspoon Salt
  • 1/4 teaspoon Pepper
  • 1 boneless, skinless Chicken Breast halves
  • Oil for frying
  • 3 cups chopped Romaine Lettuce
  • 1 cup Red Cabbage
  • 1 cup Napa Cabbage
  • 1/2 Carrot, julienned or shredded
  • 1 Green Onion, chopped
  • 1 tablespoon sliced Almonds
  • 1/3 cup Chow Mein Noodles
Dressing:
  • 3 tablespoons Honey
  • 1 1/2 tablespoons Rice Wine Vinegar
  • 1/4 cup Mayonnaise (Duke's -- It's all we use)
  • 1 teaspoon Grey Poupon Dijon Mustard
  • 1/8 teaspoon Sesame Oil
Directions
  1. Prepare dressing ingredients by mixing in a small bowl. Refrigerate while preparing salad.
  2. Cut each chicken breast into 5 strips.
  3. In one bowl, beat egg with milk. In another bowl, combine flour with corn flake crumbs,salt and pepper.
  4. Preheat oil over medium heat.
  5. Dip individual chicken pieces in egg mixture and then roll in the flour mixture.
  6. Fry chicken until browned, drain and set aside.
  7. Prepare salad by tossing the chopped romaine with the chopped red cabbage, Napa cabbage, and carrots.
  8. Sprinkle sliced green onion on top of the lettuce. Sprinkle almonds over the salad, then the chow mein
  9. noodles.
  10. Cut the chicken into small chunks.
  11. Place the chicken onto the salad forming a pile in the middle.
A couple of notes that we do here at home:
  • Add mandarin oranges (canned) to the salad. Mmmm...
  • The dressing is hard to mix by hand, so I use the food processor.
  • When we make salads, the veggies on the plate consist of whatever I've got in the fridge. So, if I've got carrots, they're there. If not, we forgo them. No biggie. Any lettuce, any veggies.
  • This recipe makes one serving. Add one chicken breast per diner, and also duplicate the dressing per diner. (ie. 2 people eating, 2 chicken breasts and double the dressing recipe.)

Enjoy, you guys. :)